Have you ever wanted to make an app where people type in a city and quickly see the weather there? This tutorial will guide you through the process of building a weather app using Python, Flask and OpenWeatherMap API.
Table of Contents
ToggleStep 1: Sign up for OpenWeatherMap API
To start, you need to sign up for OpenWeatherMap API. This lets you get weather data for your Python script. Go to OpenWeatherMap Sign Up, create a free account, and then go to your dashboard to generate an API key. This key is important for accessing weather data.
Step 2: Install the Requests module
You’ll use the Requests module to talk to OpenWeatherMap API. Before you start, install it. Open your terminal and type:
pip install requests
- This installs the Requests module so you can use it in your project.
Step 3: Import the Requests module and API key
Now that we have installed the Requests module and generated our API key, we can start coding. Open a new Python file in your favorite code editor and import the Requests module:
import requests
from datetime import datetime

# Constants
API_KEY = 'Replace_with_your_API'  # Replace with your OpenWeatherMap API key
BASE_URL = 'http://api.openweathermap.org/data/2.5/weather?q={}&units=metric&appid={}'
Step 4: Function to get the data
Fetches weather data for a given city from OpenWeatherMap.
def fetch_weather_data(city: str) -> dict:
    """Fetches weather data for a given city from OpenWeatherMap."""
    try:
        response = requests.get(BASE_URL.format(city, API_KEY))
        response.raise_for_status()  # Raises an HTTPError if the HTTP request returned an unsuccessful status code
        return response.json()
    except requests.RequestException as e:
        print(f"Error fetching weather data: {e}")
        return None
Step 5: Function to Parses the weather data from the API response
def parse_weather_data(data: dict) -> dict:
    """Parses the weather data from the API response."""
    try:
        weather_data = {
            'location': data['name'],
            'time': datetime.fromtimestamp(data['dt']).strftime('%Y-%m-%d %H:%M:%S'),  # Convert Unix timestamp to human-readable format
            'info': data['weather'][0]['description'],
            'temperature': data['main']['temp']
        }
        return weather_data
    except (KeyError, IndexError) as e:
        print(f"Error parsing weather data: {e}")
        return None
Step 6: Function to Displays the weather data
def display_weather(weather_data: dict):
    """Displays the weather data."""
    if weather_data:
        print(f"Location: {weather_data['location']}")
        print(f"Time: {weather_data['time']}")
        print(f"Weather: {weather_data['info']}")
        print(f"Temperature: {weather_data['temperature']}°C")
    else:
        print("Unable to display weather data.")
Step 7: Function to run the weather application
def main():
    """Main function to run the weather application."""
    print("Enter the city name:")
    city = input().strip()

    data = fetch_weather_data(city)
    if data:
        weather_data = parse_weather_data(data)
        display_weather(weather_data)
    else:
        print("Failed to retrieve weather data.")

if __name__ == "__main__":
    main()
Save the Python file as “weather_app.py”. Now, with our weather app in place, we can test the application. Run the following command in the terminal and enter the city name to get the weather information.
In the above code, we retrieve weather data from OpenWeatherMap by querying a specific city. Using Python’s requests library, we fetch the data based on the city name provided by the user. The data includes information about the city’s location, current time, weather description, and temperature in Celsius. After executing the Python script, the output will display these details for the queried city. Code Repo
Step 8: Build Application using Flask
- Create folder structure
/your_project_folder
/templates
index.html
app.py
app.py
from flask import Flask, render_template, request, jsonify
import requests
from datetime import datetime

app = Flask(__name__)

# Constants
API_KEY = 'Replace_with_your_API'  # Replace with your OpenWeatherMap API key
BASE_URL = 'http://api.openweathermap.org/data/2.5/weather?q={}&units=metric&appid={}'

def fetch_weather_data(city: str) -> dict:
    """Fetches weather data for a given city from OpenWeatherMap."""
    try:
        response = requests.get(BASE_URL.format(city, API_KEY))
        response.raise_for_status()
        return response.json()
    except requests.RequestException as e:
        print(f"Error fetching weather data: {e}")
        return None

def parse_weather_data(data: dict) -> dict:
    """Parses the weather data from the API response."""
    try:
        weather_data = {
            'location': data['name'],
            'time': datetime.fromtimestamp(data['dt']).strftime('%Y-%m-%d %H:%M:%S'),
            'info': data['weather'][0]['description'],
            'temperature': data['main']['temp']
        }
        return weather_data
    except (KeyError, IndexError) as e:
        print(f"Error parsing weather data: {e}")
        return None

@app.route('/')
def index():
    return render_template('index.html')

@app.route('/get_weather', methods=['POST'])
def get_weather():
    city = request.form['city']
    data = fetch_weather_data(city)
    if data:
        weather_data = parse_weather_data(data)
        if weather_data:
            return jsonify(weather_data)
    return jsonify({'error': 'Failed to retrieve weather data'}), 400

if __name__ == '__main__':
    app.run(debug=True)
Index.html
<!DOCTYPE html>
<html lang="en">
<head>
    <meta charset="UTF-8">
    <meta name="viewport" content="width=device-width, initial-scale=1.0">
    <title>Weather App</title>
    <style>
        body {
            font-family: Arial, sans-serif;
            display: flex;
            justify-content: center;
            align-items: center;
            height: 100vh;
            margin: 0;
            background-color: #f0f0f0;
        }
        .container {
            background-color: white;
            padding: 2rem;
            border-radius: 5px;
            box-shadow: 0 2px 10px rgba(0, 0, 0, 0.1);
            text-align: center;
        }
        input, button {
            font-size: 1rem;
            padding: 0.5rem;
        }
        button {
            background-color: #4CAF50;
            color: white;
            border: none;
            cursor: pointer;
        }
        button:hover {
            background-color: #45a049;
        }
        #weather-info {
            margin-top: 1rem;
        }
    </style>
</head>
<body>
    <div class="container">
        <h1>Weather App</h1>
        <input type="text" id="city-input" placeholder="Enter city name">
        <button onclick="getWeather()">Get Weather</button>
        <div id="weather-info"></div>
    </div>

    <script>
        function getWeather() {
            const city = document.getElementById('city-input').value;
            const weatherInfo = document.getElementById('weather-info');

            fetch('/get_weather', {
                method: 'POST',
                headers: {
                    'Content-Type': 'application/x-www-form-urlencoded',
                },
                body: `city=${encodeURIComponent(city)}`
            })
            .then(response => response.json())
            .then(data => {
                if (data.error) {
                    weatherInfo.innerHTML = `<p style="color: red;">${data.error}</p>`;
                } else {
                    weatherInfo.innerHTML = `
                        <h2>${data.location}</h2>
                        <p>Time: ${data.time}</p>
                        <p>Weather: ${data.info}</p>
                        <p>Temperature: ${data.temperature}°C</p>
                    `;
                }
            })
            .catch(error => {
                weatherInfo.innerHTML = `<p style="color: red;">An error occurred. Please try again.</p>`;
                console.error('Error:', error);
            });
        }
    </script>
</body>
</html>
Step 9: Save and test the flask app
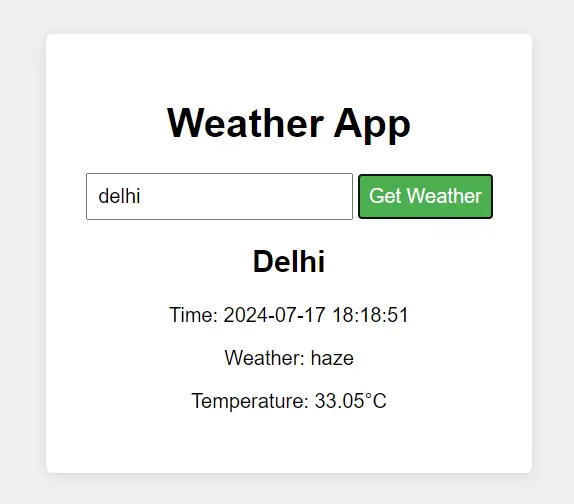
Save the Python file as “app.py”. Now, with our weather app in place, we can test the application. Run the following command in the terminal. Code Repo
python app.py
Enter a city name when prompted and hit Enter. The app should retrieve weather data for the given city and print the temperature and description to the console.

I hope you liked this article on Build Real-Time Weather Application using Python. Feel free to ask your valuable questions in the comments section below.


